Digital images and workflow.
(1). Workflow is a description of the method you use for handling your image files, organising, saving and storing them. The likelihood is that by the end of the course you may have shot several thousands of images and these need to be organised and stored in a way that enables you to find and access them for future use. In the 2nd year, you'll be compiling a portfolio and you'll need to come back to the images you shot at the start of the first and through the first making decisions as to whether they'll be used in your Portfolio that you'll use to see employment with or gain access to a University course.
This process of making decisions about the size and file types you shoot using your camera, the way you get them off your camera into your storage (Hard-drives, cloud storage) etc and then from there to your design sheets, Task folders or prints is called work-flow.
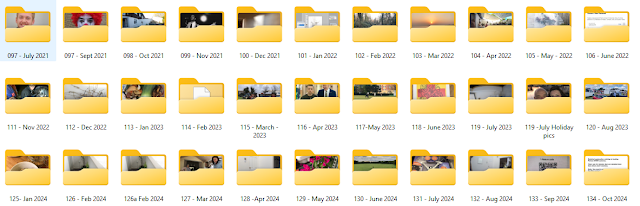
*Note Workflow is knowledge, technique and process information that should be identified in your S&K design sheet (Use images and text). Use images such as the one here that shows the current method that I use to store my images in...
My workflow works on the basis that as I remove the files from both my phone and cameras, they're stored in folders on PC hard-drives in numerical order
named with the month and year. It's not the most efficient method as it's reliant on having to remember roughly when any image was shot in order to retrieve it for any reason (Printing or sending to someone who wants to see it or use it, or using for my own personal use). Inside these monthly folders there may be sub-folders
named with titles that make it easier to locate specific images because the sub-folders can be named and
searched for using windows search functions.
You could adopt the same approach naming your first folder 001- Sept 2024
Within that folder you might have sub-folders with specific folders for the work you've already made...
Therefore in your Sept folder you should have all the scans (Negative and Positive) from the pinhole work.
You should also have the work from the Deadpan series that was shot in the atrium with Dave T.
It probably follows that your own shoot was shot in October and all the images that were printed and scanned should therefore appear in the October folder (001 Oct 2024).
This organised approach (Workflow) becomes far more critical once you start to shoot digital images as there's virtually no restriction with regards to how many frames (Images) you shoot. The only issue that needs to be considered is the time it takes sorting through the images making decisions as to which ones are the better versions that you'll use.
Another thing to remember is to name your files logically.
(2). Methods to get the images off your camera into your One-drive folders
There's a number of ways to get the images off your camera into. The link here is for the Blue Tooth method...
My recommended way is to simply use the cable that is supplied with your camera. These are the same type of cable used in conjunction with the flat bed scanners at college.
When you plug the cable into your camera and turn it on, a new folder appears in the
file explorer sidebar attributed to the camera...
Another option that is straight-forward is to use, is a SD Card reader. *When you use these, the camera has to be turned off before removing the card from the camera and the SD card is removed and plugged into the card reader which is then plugged into your PC/Laptop.
Similarly a new icon appears in the file explorer bar...
You'll probably see the USB Drive coloured red A and then below that the folder DC1M and then below that camera folder blue B where you'll find your images.
To remove the images use CTRL + A which selects the files, followed by CTRL + X which cuts the files. The find the folder where you're going to save the files and use CTRL + V to paste the files.
(3). File sizes for "Best images" and "Finals"
When you're working with Hard-copy images e.g. actual prints or work that you physically make. If they're good enough to be used as finals or for use as examples of your better images mid-project, when you scan them they should be scanned at a slightly higher resolution... 150dpi
(4). Digital file sizes and design sheet use
As you've seen in the WEX lessons, your JPEG files are relatively large and each image you add to your design sheet straight off the camera is approximately a megabyte in size. Therefore as you add more and more the design sheet gets bigger and bigger. The design sheet eventually reaches a size where it begins to become slow to save, use and update and also difficult to upload and submit at the deadline. There's a couple of thing you can do...
(a). As you produce your PPT or Word doc you can reduce the size of the image within the app, program.
Or you can reduce the size of multiple images within the storage folder for input into your design sheet. This also works with converting files from one type to another e.g. RAW files to PNG's.


No comments:
Post a Comment