Sunday, October 20, 2024

Shoot folders & work-flow

 Digital images and workflow.

(1). Workflow is a description of the method you use for handling your image files, organising, saving and storing them. The likelihood is that by the end of the course you may have shot several thousands of images and these need to be organised and stored in a way that enables you to find and access them for future use. In the 2nd year, you'll be compiling a portfolio and you'll need to come back to the images you shot at the start of the first and through the first making decisions as to whether they'll be used in your Portfolio that you'll use to see employment with or gain access to a University course. 

This process of making decisions about the size and file types you shoot using your camera, the way you get them off your camera into your storage (Hard-drives, cloud storage) etc and then from there to your design sheets, Task folders or prints is called work-flow. 

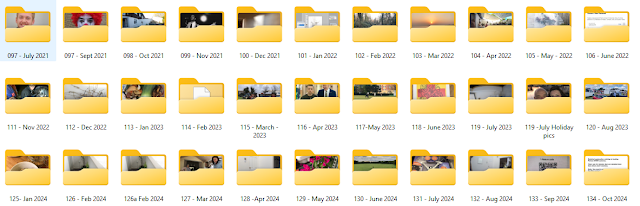
*Note Workflow is knowledge, technique and process information that should be identified in your S&K design sheet (Use images and text). Use images such as the one here that shows the current method that I use to store my images in...


My workflow works on the basis that as I remove the files from both my phone and cameras, they're stored in folders on PC hard-drives in numerical order named with the month and year. It's not the most efficient method as it's reliant on having to remember roughly when any image was shot in order to retrieve it for any reason (Printing or sending to someone who wants to see it or use it, or using for my own personal use). Inside these monthly folders there may be sub-folders named with titles that make it easier to locate specific images because the sub-folders can be named and searched for using windows search functions.

You could adopt the same approach naming your first folder 001- Sept 2024
Within that folder you might have sub-folders with specific folders for the work you've already made...


Therefore in your Sept folder you should have all the scans (Negative and Positive) from the pinhole work.

You should also have the work from the Deadpan series that was shot in the atrium with Dave T.

It probably follows that your own shoot was shot in October and all the images that were printed and scanned should therefore appear in the October folder (001 Oct 2024). 


This organised approach (Workflow) becomes far more critical once you start to shoot digital images as there's virtually no restriction with regards to how many frames (Images) you shoot. The only issue that needs to be considered is the time it takes sorting through the images making decisions as to which ones are the better versions that you'll use.

Another thing to remember is to name your files logically.

(2). Methods to get the images off your camera into your One-drive folders

There's a number of ways to get the images off your camera into. The link here is for the Blue Tooth method...

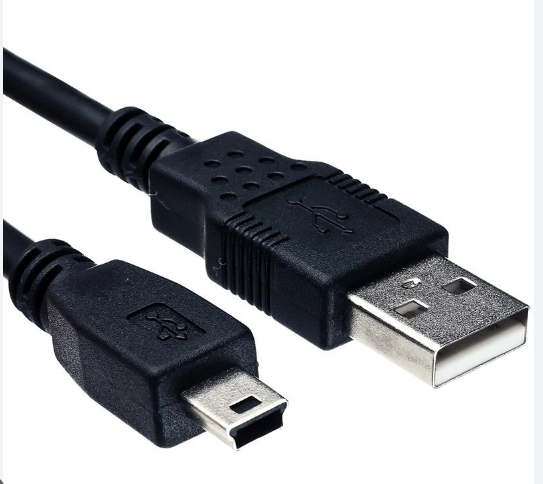
My recommended way is to simply use the cable that is supplied with your camera. These are the same type of cable used in conjunction with the flat bed scanners at college.


When you plug the cable into your camera and turn it on, a new folder appears in the file explorer sidebar attributed to the camera...


Another option that is straight-forward is to use, is a SD Card reader. *When you use these, the camera has to be turned off before removing the card from the camera and the SD card is removed and plugged into the card reader which is then plugged into your PC/Laptop.
Similarly a new icon appears in the file explorer bar...                                                                                                                  


You'll probably see the USB Drive coloured red A and then below that the folder DC1M and then below that camera folder blue B where you'll find your images. 

To remove the images use CTRL + A which selects the files, followed by CTRL + X which cuts the files. The find the folder where you're going to save the files and use CTRL + V to paste the files. 


(3). File sizes for "Best images" and "Finals"
When you're working with Hard-copy images e.g. actual prints or work that you physically make. If they're good enough to be used as finals or for use as examples of your better images mid-project, when you scan them they should be scanned at a slightly higher resolution... 150dpi


(4). Digital file sizes and design sheet use
As you've seen in the WEX lessons, your JPEG files are relatively large and each image you add to your design sheet straight off the camera is approximately a megabyte in size. Therefore as you add more and more the design sheet gets bigger and bigger. The design sheet eventually reaches a size where it begins to become slow to save, use and update and also difficult to upload and submit at the deadline. There's a couple of thing you can do...

(a). As you produce your PPT or Word doc you can reduce the size of the image within the app, program. 

Or you can reduce the size of multiple images within the storage folder for input into your design sheet. This also works with converting files from one type to another e.g. RAW files to PNG's. 


Thursday, October 10, 2024

Visual Language Task

 Person + Background + Symbol + Involvement = Picture.

In your S&K design sheet, upload the images you shot today of me and each other annotating them explaining how the images came together. Comment how, by adding different components, the narrative is changed and gradually becomes clearer. Also discuss how ambiguity can play a part in making an image interesting - questions left un-answered in themselves help to make images interesting. 

Put this work under the heading Visual Language and explain it in terms of image construction and deconstruction analysis. 

Kylie Minogue Camden 1994 (Derek Ridgers) Image analysis

Use the content from the session to do your own deconstruction of the Kylie image (Only if you've completed your research though). It's far more important to get your Photographer research completed for your project. Once you've completed the research, then do the Kylie Minogue image analysis - put this in your S&K design sheet. Discuss whether you feel the person + background + symbol + Involvement = Picture 

Sunday, September 15, 2024

35mm Location Portrait task

 New Task - New Design sheet.

Name the design sheet using your name at the front like this. This will be referred to as your main design sheet.

Teresa Green-35mm Location Portrait

As with all of these tasks, you need to write up your work diary style recording what you do in the order as you do it. Explain and name the equipment and materials you use and describe your processes. The descriptions and explanations in this design sheet should be concise using images as much as you can to evidence your activities and learning.

Over the last two sessions, you've been introduced to the Pentax K1000 and been shown how to load the film and set the controls for the ISO, aperture and shutter. You've been shown how to focus the camera and how to take light readings using the Kodak 18% grey card. With me, we've discussed...

  • Exposure values and the Kodak rule for bright sunny days.
  • The relationship between ISO, shutter speed and aperture.
  • How each of the components of the exposure triangle are affected by changes and how these changes are discussed in terms of 'Stops'.
You've also been introduced to the concept of 'Objectivity' in Photography and some basic principles relating to composing people within the frame of the camera. Finally you've been shown how to unload the camera. 

Use my description above accompanied by images to explain what you've done so far.

The details - The skills and knowledge design sheet https://2024-2026.blogspot.com/2024/09/skills-knowledge-design-sheet.html


_________________________________________________________________________________

In week one, you'll be guided with regards learning how to use the Pentax K1000 camera...

The initial shoot you'll be guided and told exactly what you need to do. You'll be shooting images of each other in an 'Objective' manner much like a Passport photograph. 

The images need to be shot in a systematic and consistent way from the same view-point with the same composition for each person. You will probably have 24 or 36 shots to use. You need to shoot a minimum of 6 different people. You're advised to shoot 12 of the shots using one composition "A" for instance cropped just below the hands with a gap above the head and "B" a head and shoulders crop again, making sure you leave a gap above the head (See below) 

In the first lesson with Natalie you'll be learning how to use and load film into the 35mm film cameras (Pentax's). You need to have £8.00 for HP5+ on Monday and come in before the session and pay for the film at reception using the pay in the code (see teams message). 


Working with Models

Working with models (professional practice). 

Composition and posing 

Composition is the placing of the subject within the frame when shooting pictures creating an aesthetically pleasing balance between the other elements within image. 

One of the first sessions you'll do on the course where you'll need to pose other people and work with composition is the session where you'll be shooting with the Pentax K1000 camera. You'll be given the task to shoot against a specific background and told to shoot your images composing them using 2 compositions. Shoot 12 shots one way using 4 or more models (People from your class) and then another 12 using your second composition.

Click on image for source

The top 2 are good choices

(A) Make sure you 'Crop' just below the hands and leave a small gap between the top of the frame and the models head.

(B) Make sure you crop just cutting into the arms either side and leaving a gap between the top of the head and the edge of the frame. 

In this first exercise we aim to produce an 'Objective' neutral image of each of the models we shoot. This is also referred to as 'Deadpan'.

The pose should be consistent for each of the sets of 12.

The model should not smile, they should not clench fists, they should look directly into the camera. 

No lanyards and if possible no labels or designs on the clothes. 

The approach to shooting the image should be as neutral as possible - so that anyone looking at it, has very little sense of who the person is.

This approach is influenced by set of historically important images shot by Thomas Ruff in the 1980's . Click the image below...
This approach is interesting when applied to different subjects where it's not the expected approach. The usual expectation of a portrait is to be far more subjective where there is an effort to show the character of the person in the image. This approach attempts to remove many of the usual conventions seen in portrait photography by using a systematic mechanical method seen in portrait photography. See here
 https://assets.publishing.service.gov.uk/media/5a7e2f0140f0b62302689b37/Photoguidance_v7.pdf

This Neutral, matter of fact, no drama approach is known as 'objective' and can be one of the ways that you approach any of your images of people in a range of situations. The lack of drama or narrative is added by the use of neutral flat light (Diffuse light) and a lack of colours in both the background and the clothing selected. 

If your stuck with ideas for poses in any shoots, this can be your go to method of getting started. I'd always recommend shooting some image in this way in most of your shoots involving people. 


Friday, September 13, 2024

Skills & Knowledge Design sheet

 Updated 29/9/24

Your skills and knowledge design sheet (S&K) is an on-going document that you need to work on throughout the course.

I'll post a list of things you should try and include in your S&K design sheet here, with the newest at the top of the page.  Aim to produce the equivalent of a column for each one, but some will probably need more than a single column. The important part of each one is your own written account of your own use and experience of using these items or techniques


You'll start to realise that you'll be able to group some of these into associated sections within your work. If you'd previously written about the Pinhole camera, it makes sense that as you add a new camera such as the Pentax, they'd be in the same section together? 

Aim to do this work when you can, the main design sheet is the important one to get completed, just keep this one ticking over - try and do one or tow of the subjects every day or so.


_____________________________________________________________

_____________________________________________________________

_____________________________________________________________
  • Pinhole camera
  • H&S in the darkroom - chemicals and skin
  • Dish processing
  • Black and white darkrooms (Analogue). 
  • Hard-copy scanning using Photo-copiers

Friday, August 23, 2024

Pinhole Photography Task (Guidance)

 The pinhole task is Task 1of 4 tasks that form Unit 1 that lasts from Sept to March. 

The pinhole task is a quick turn around task with a deadline on Friday 13th Sept.

The way you need to work_____________________________________________

Your work is produced across two Design sheets...

The main design sheet: This is where you record the majority of your activities relating to the production and recording of your research, planning, execution of the work and reflections. This work needs to be produced and up-dated on a daily basis as you produce it. Ideally, it would be produced in a specific order...

  • Your photographer/artist research
  • A reflection on the research - explaining why it is useful to you and the project
  • A plan for your practical activities
  • Evidence of the practical work (Your images) with annotations
  • Reflection on your learning and work
The Skills and Knowledge design sheet: This where you record your wider general knowledge relating to the Pinhole project and photography. The work you produce for this demonstrates using images, diagrams, sketches and written explanations showing you know what it is, why and how it's used and the impact on your work. 

This is an on-going body of work that is updated day to day, continually throughout the course as your knowledge grows and is submitted at each deadline along with your main design sheet. 

With regards the Pinhole Task, you'll be expected to explain and demonstrate knowledge via your activities and further independent research on the following...

  • Pinhole camera
  • RC VC Photographic paper
  • Darkroom
  • Dish processing
  • Safe light
  • Darkroom Health & Safety, issues, precautions and PPE   (H&S) 
  • Paper Drying machines
  • Diffuse light
  • Point light
  • Exposure
  • Depth of Field (Dof)
  • Shutter speed
  • Aperture
  • Field of view
  • Photo-copiers and their use in scanning 
  • File types/formats pros and cons of using - JPEG, PNG, TIFF
  • Flatbed scanners - their use in scanning 
  • Ilford Multigrade developer
  • Ilford Ilfostop 'Stop bath'
  • Ilford Hypam 'Fix' 
  • Composition - landscape & Portrait format, rule of thirds
General guidance: WORK FAST and efficiently. 
The gist of this project is that you have got to work towards producing two final images through the process or planning, experimentation and development that would potentially have value in a commercial sense. The context set is the images might be suited to either - book or album covers (Choose 1). The theme  is 'Sinister/Creepy'. 

You have to be creative - given the constraints of working in college, you will need to 'Design' your image using composition and basic approaches such as the use of body language and facial expressions. You're encouraged to bring in or buy props, use make-up and style your images to enhance the end results. 

Make use of the slow shutter speed to help enhance the weird and creepy feel.

Do further research looking at creepy images from films like - The Blair witch project or The Ring (The images of the scary girl). 

*You can come in early and stay behind in order to keep on top of the written content and the putting together of your design sheets. 


Saturday, April 27, 2024

Photographer/Artist research guidance

 Your work is divided up into two main types. 

(1). Your personal project referred to as you main design sheet and 

(2). The skills & knowledge design sheet

  • Professional Practice (Includes H&S)
  • Technical and techniques 
  • Light and lighting
  • Materials and equipment 

__________________________________________________________________ 

The guidance here relates to your Photographer/Artist research work and this work appears in your main design sheet.

The basics...

(1). Use small font sizes on white pages so that the work looks 'Level 3' and looks professional. *You're graded on your ability to communicate professionalism 

(2). This is a visual art subject and therefore we use images to communicate. Make sure you include lots of images to convey your knowledge, understanding and evidence that you've researched in-depth. 

(3). As a minimum produce 2 x A3 pages on each of the Photographers you research. The work should look something like this image here once completed... *You should aim to get this done within the first few days of being issued the task. 

(4). Compile a bibliography e.g. a list of the websites you use to collate your research and use quotes in your work (Details further down the page). 


The objective is to research and identify how the Photographer makes a living through photography. Where their work is published, sold, seen, whether they sell their work as 'Art Photography' via their website of via galleries, if they publish books, have a Youtube channel (Rare) and if they work as lecturers or doing educational seminars (Talks).

As your can see in the example above, there's around 50% images and 50% written. 

(5). Each photographer/artist normally takes around 2-3 hours to do, what with the reading and searching for relevant information. The first 2 pages are examples of the photographers work from a series of images you're looking at. The 3rd page is made up of images that show how the photographer makes money through photography, typically you should include images of...  

  • Images of the photographers work hung in a gallery
  •  Front covers of magazines the photographers had published
  • Images of the Photographers work being sold on auction websites 
  • Images of the Photographer with their work or with a camera either working or just posing with it around their neck or similar
  • Screen grabs from the Photographers website with a list of clients
  • Screen grabs from the Photographers website with a list of exhibitions/shows
  • Screen grabs from the Photographers with list of publications *Some have 'Tear sheets' e.g. scanned images of the publication - copy a sample these pages to show where they've been published. 
  • Screen grabs of Amazon pages showing they make money through selling books. 
  • Screen grabs of Youtube pages if they do on-line lectures and talks. Or if their work is featured in Vogue videos or similar 

(6). The Written work...

Keep in mind the fact that what you need to show in your research is that you understand and have identified what kind of photography the photographer produces (Genre). When you do this, explain the basic indicators of the genre(s) you identify. 

  • Editorial 
  • Advertising
  • E-Commerce
  • Art
  • Stock Photography
  • Social Photography 
  • News Photography 
  • Publicity/Promotional
  • Social media Photography 

*Note these cross-over with each other and are used across different genres in many instances. 

What is the Photograph's purpose? (Operational context) e.g. is it... selling a product, promoting a brand or a person, educating the audience, reinforcing family cohesion and social tradition, informing or is it 'Art'.

Who is the Client (Commissioner) of the Photography? e.g. who is paying the Photographer to do the work you're researching or was it produced 'On Spec' e.g. the Photographer produced the work costing time, effort and money with the intention that it is sold at a later date "Speculative" photography. *Make sure you also list the Photographers other clients.

Where is the work seen? e.g. Websites, magazines, galleries, point of sale, posters, packaging, Adshel bus stops, roadside posters, Newspapers, weekend supplements (Newspapers). 

Who is the Audience? Look at the images; where they're seen and what they're used for, how they're presented, what do they feature and how visual language is used in them? Analyse who is the audience for the images? 

The example here below "Barney". Its pretty obvious by the nature of the theme, use of colour, background, props, facial expressions and body language who 'Barney's' audience is.


When discussing and analysing audience you aim to identify demographic details of the audience for the work or single image you may be analysing. 

The Prompts___________________________________

Below are a series of prompts that you need to use when writing up the analysis of your chosen single image in the style of the example here below...


Single image

Analysis Example


(7). Analyse a Key Image from the work you've researched.

Looking at the single image you've chosen analyse and deconstruct it using these prompts. Skip any that don't seem to be usable and do the easy ones first. The most important ones are the Blue ones at the start of the list - so always look to do these first.

*Note use the Bold words as headings in your work as these relate to the assessment criteria. 

  • Client Looking at the image, is it obvious who the client is - explain/analyse in as much detail as you can how anyone looking at the image would be able to figure out who the client is. Why does it suit the clients needs - what are the clients needs in this instance? 
  • Genre Looking at the image, is it obvious what genre the image belongs to? Explain your analysis in detail. 
  • Function/Purpose (Operational context) looking the image is it obvious what the image is for - what's its purpose? Explain/analyse how you know the images purpose? How does the image work? Discuss whether the image does this in isolation (perhaps using the formula person+background+symbol+ involvement = picture)? Or, does the image need to be seen together with other associated images as a set in order to have a full understanding of its purpose/function (Operational context)? Or, does it need text or to be seen in a wider context? 
  • Audience/Users Looking at the image, is it possible to tell anything about its potential audience? Analyse the image explaining why it suits the users (audience) that it is designed to suit/attract/be of interest to or sell to etc.

Now use the remainder of the prompts to complete your research page. Always try and write your responses focusing on the fact that your trying to show good knowledge of how photography works in a commercial/professional context. 

  • Techniques This refers to how the images have been shot and offers opportunities to identify and analyse professional approaches (Operational context) v amateur … Tripod; Hand-held; Slow shutter speed, wide aperture, out of focus, panning, fill-in flash, Studio lighting, ambient light, Location photography, fly on the wall, Candid, wide angle, telephoto, large format, under-water, ariel, high view-point, low view-point, eye level, golden hour, subjectively, objectively etc. The more you read about photography and study photography, the more you’ll be able to refer to these techniques.

    • Background Backgrounds are important – look at the background and explain how and why it’s been used. If it’s a plain background – what colour is used, what is the psychological and cultural significance of the colour and does that matter in this image? If its a place or a set, what does that tell you about the subject – is it used as part of the narrative – analyse in terms of socio economics – what does the background tell you about the person and who they are? (Key words to use… Background, meaning, convey, narrative, Story, significance.).
    • Materials If you can identify the materials used in the images and explain why they have been chosen for this purpose. Do the materials bring anything specific to the image that helps with conveying meaning or narrative. To identify hard-copy work in galleries use the prompt ‘Sold at auction’ pre-fixed with the Photographers name, use the auction websites to ascertain the material images are printed on and the size and costs that the images sell for. Explain how the use of expensive materials/papers/frames and mounts if evident in the work you've looked at helps to connote quality and professionalism. (Key words to use… Materials, professional, finish, quality, Giclee, C-Type, Fibre-based. printspace).
    • Body language/Facial expressions Look at and analyse the body language and facial expressions of the people in the image/s. Comment on it – is it relevant, is it a part of the story – what significance has it on the impact of the image. (Key words to use… Eye contact, passive, aggressive, indifferent, friendly, alluring, confrontational, expression.).

      • Colour or Black and white Explain why the image is B&W if it’s not colour? Is the reason because of the images age and it’s been shot on B&W film? Does the fact that it’s B&W or colour have an impact on the way the image is perceived – is colour an important aspect to the image does it convey meaning in some way? Is it B&W to create a sense of mood and drama? Explain in some detail and *analyse. (Key words to use… Mood, drama, stylish, classy, gaudy, cheap, tacky, perceived, impact, convey, meaning.).
      • Lighting How has the light been used? Identify it and analyse it in terms of it being – Point, Diffuse, natural, ambient, warm, cold, harsh, high-contrast, flat, interior, fluorescent, tungsten, HMI, dramatic, subjective, objective, mood and colour cast. (Key words to use… Any of the above.).
      • Location This is similar to your analysis of the background. Why has the location been used, what does it convey in terms of the narrative? Where is it, does the background make sense in terms of the subject? Would there have been difficulties in shooting at this location – would have been hired or permissions sought in order to shoot images there? Is there anything distracting in the background, does it work in term of colour and content. Would it have been difficult to work in this location would the photographer have been disturbed by the public or locals? (Key words to use… Narrative, story, difficulties, planning, Trespassing, locals, public, private.).
      • Style/Period Look at the images and analyse the styling and the period identified in the images. Have these been shot at that time or have they been styled retrospectively, this is often seen in Fashion photography, why has this been done? Is it because this is part of a trend? Or is the style associated with a movement or organisation e.g. a uniform. What does the style evoke or say about the image and or narrative?  (Key words to use… Trend, style, period, evoke, historic, modern, contemporary, current, retrospective, uniform.).
      • Props How are props used in the images – where do they feature, have they been introduced, and how do they help in conveying meaning and narrative. (Key words to use… Props, meaning, convey, narrative, Story.).
      • Constructed or natural Through your research ascertain whether the images have been set up or is it real-life. Are the images fly on the wall documentary style or have the people in the images colluded with the photographer and therefore been controlled and set up to any extent, what are the clues or is this the Photographers style and approach? Or are the completely controlled as in Fashion photography or photography that has been commissioned in advance and everyone involved is fully engaged with the process? (Key words to use… Constructed, arranged, planned, candid, stye, process.). 
      • Equipment What equipment has been used (Use images of the equipment on the images page). Why has this equipment been chosen, why does it suit this particular photographic approach what if another approach using different equipment was used – how would that affect the images? (Key words to use… used, chosen, choose, rationale, justified, necessary, fit for purpose.)
      • Processes Look at the images and or through your research establish what processes have been used. This can be traditional dish processing and film processing using analogue methods, or it may be post production methods using digital systems such as Photoshop. It might also include hand-rendered processes such scratching, degrading, staining, drawing onto the surface, painting, tinting etc. Identify these and analyse why they have been used – does it enhance the image if so how? (Key words to use… Post production, analogue, digital, stages, development).
      • Mood Closely associated with aspects such as Body, language, lighting. If not mentioned previously, you can analyse this aspect as a stand-alone aspect of the image. (Key words to use… Mood, dramatic, lighting, expression, body language, feel.).
      • Influence No Photography is original – everything has been seen before in some way. Identify who has influence the work, this is usually seen or heard about in interviews with the Photographer/Artist. Use an image on your image page that shows the visual connection and identify the work and artist/photographer that this photographer has  been influenced by. (Key words to use… Influence, copied, aspects, connection.).
      • Empathy & Relationships Look at the photographer and they are in relation to the subjects/people in the images. Does the photographer share the same status as the subjects in terms of things such as… Values; Religion; Ethnicity; Race; Politics, Wealth, Beliefs etc? Thinking about these aspects, are the images shot with a sense of impartiality/neutrality or do the images elevate or demean the subjects? Consider a white affluent photographer with a £15,000 camera and lens around his/her neck shooting images of people who have less opportunity in life – is this exploitative? (Key words to use… Relationship, status, neutral, elevate, demean, impartial, exploitation.).


      Quoting in your work_________________________

      "Use quotes in the work; These should be made obvious (Light blue on the example). Also make them stand out by indenting them and making the text italic and using a different coloured font as here and use speech marks. Finally, link the quote to its source. Number each of the quotes in order and type the number in brackets at the end of the quote and the identify which website it comes from by putting the number at the end of the website address (HTML Link) in your bibliography".(1)

      Bibliography You must compile a bibliography e.g., include a list of HTML (Internet web page links) within the work – typically include 4-6, using the main websites you’ve sourced your information and images from. (Dark blue text on the example). Use smaller text e.g. 9 point.


      Mid-Project additional research & 

      ICT (In class task) Research 

      Within each of your own projects or in conjunction with the In-class tasks (ICT's) your work might hit a 'Brick wall' where you run out of ideas. The easiest solution to this is to always be researching photographers in order to generate additional ideas or merge ideas. The best way of doing this is to use books or Journals. Probably, the best way in the world is to this is to use The British Journal of Photography which we have in the LRC on the first floor and you should have a look at once a week. Plus more links below for quality websites.


      With the mid project research, if you did a good job in the initial research at the start of the project you can get away with a column of research on the any that you add. The key is to add the relevant images that you're influenced by and the written content generated by using the Blue prompts up the page (see left)


      https://www.1854.photography/  The British Journal of Photography. Go and see the real thing in the LRC or ask Dave for copies of Back Issues that he has. The ones in the library are current... The very best of contemporary photography being produced now. 

      https://www.theguardian.com/artanddesign/photography    The Guardian newspaper

      https://americansuburbx.com/photography    ASX American Suburb X One of the best for contemporary and historical Photography

      https://www.magnumphotos.com/    The magnum picture agency (Worlds best Photographers)

      https://www.itsnicethat.com/photography    Our archive showcases the work of thousands of talented photographers, working across fashion, fine art, documentary, and everything in between (Current and recent).

      https://www.the-aop.org/    Current professional/commercial photographers (2nd year work) looking for work and opportunities to assist. 


      Friday, April 26, 2024

      Post Research Reflection

       Once you have completed the research you have to explain (Reflect) on why it is useful...

      The research should have helped you generate some ideas about the kind of photography you intend to produce (Genre) and given you some ideas about your practical approach. 

      This is your Initial intention. 

      • Operational context of your own work explain/analyse your thoughts on what type of work your project is going to be based on at this point. Are you producing Stock images; Social Photography; Editorial photography or something else? Or, are you uncertain at this point and you're going to see how your work comes together over the next couple of shoots? Explain where you are in terms of your photography's operational context (Type of photography) and your initial intention. 
        •  If you're unsure - offer a few suggestions where your work might fit into the world of photography? 
        • If you've got a good idea of the type of photography you're aiming to produce - explain its attributes - who typically might your client be, where might the images be seen, what is the purpose of the images potentially and what audience are you aiming at in terms of demographics?


      • Progression/Value explain/analyse your thoughts on how useful the knowledge you've gained from this research task is in terms your progression...
        • Has the research given you ideas or helped in terms of lighting/techniques/materials/approach? How will the research inform your own work? What aspects of their work will you borrow for your project? 
        • Do you think the research and knowledge gained will be useful as you progress through your course enabling you to attain passes, merits or distinctions? 
        • Do you understand that the research will be useful in terms of progressing onto a Degree course at the end of your 2nd year - explain your understanding. 
        • Can you see that the research you've done generally expands your knowledge of the options available to you as a potential photographer in the future - explain this in detail in your own words being specific about the research you've produced in this instance. 


      • Note These details can change as the project develops as long as you explain and detail the changes in your reflective practice. 


      Thursday, April 25, 2024

      Planning your shoots

      You've reflected on your research and you kind of know what you need to do, what you're taking from the research and what type of photography (Genre) you're looking to produce. Now you're ready for the next stage... Writing a plan for your first shoot. 

      The list below is comprehensive with lots of prompts suited to doing a big organised final shoot in the studio with models, assistants and others. Aim to use the ones that are coloured blue as a minimum.

       Plans use an image of a checklist that's been ticked off and written on

      Every piece of practical work needs to be preceded by a robust and detailed plan. Your plans offer opportunities to problem solve (AC2) and are another of the sections in your work that should be produced in detail. Furthermore, the more detailed the plan, the more it evidences professional practice (AC4) and more advanced knowledge.  The plan should include the following components.

      • Your shoot/activity: Where, when, who with. With regards where; you can use maps, diagrams and weather reports for instance if you’re shooting on location, where might also include a picture of your shooting venue empty before placing the model or subject in it. The weather report also ties in with when as you might have to work around rain etc and failing light. When also might include showing your studio booking from the technicians room?  With who this gives you the opportunity to use evidence of professional practice by using ‘Go-see’ type images of your model/s.

      • Camera: What camera and why… why is the camera fit for purpose? *You might be able to copy some basic details from your “Equipment stand-alone page” Where you should have a lot of details about your camera. You can also add an image of the camera.

      • Media: Digital/Film/Paper? Identify the media your using and whether when you shoot digital your set up (File type/size). If your shooting film what film and why – what makes it right for this purpose? 

      • Lens: What lens and why, you might discuss the lenses properties and what it gives you in terms of DoF, focal length and field of view. Will you change the focal length – what might be the consequences of doing so? 

      • Light: What light will you be using and why? What impact will the light have on the subject and how will it communicate your meaning/mood/narrative. Make sure you discuss the light in terms of the problems/benefits it might create and its qualities/characteristics… Point, diffuse, colour, intensity.

      • Non-Student model permission forms: Screen grab and include the permission form allowing outsiders to visit the college and explain the rules relating to this scenario. 

      • Pose references: If you’re shooting people – gather together a collection of images of a range of poses that both you and the model can look at and try. This can be a couple of sheets of A3 with lots of images of posing ideas that you print off and use in your shoot. Screen grab this and add to your planning and explain the purpose. 

      • Reference Image: If your starting the shoot with one specific image in mind, consider including the image in the plan at this point with a little analysis saying what it is about the image you’re going to ‘Borrow’ and are influenced by specifically.

      • Goals: Testing, trying, experimenting, improving, developing and refining. Explain what you’re aims are in this shoot. Most of your shoots with the exception of the final one should be about all of these goals. 

      • Check list: Type up a checklist of equipment and things you’ll need on your shoots (Studio and location), print this off and use again and again. Before each shoot – use it, tick off and check all the things you might need using a *pen/pencil, from charged batteries all the way through to woolly hats and sun-tan cream for shooting on location (AC4 professional practice). *Shows you actually use it.

      • Floor plans/Lighting diagrams: Always have a lighting diagram, showing where your lights and reflectors are going to be in relation to your subject and camera. This applies on location as much as it does with studio work. On location use Google maps and show the direction of the light when you’re shooting and analyse where the light will be in relation to what you’ll be shooting. Will be an issue – will you be shooting with the light or into the light – how will this affect your images visually and technically. 

      • Props: List or use images of any props you’re using, detail any clothing styling changes that you plan, maybe have an inventory of the clothes you hope to shoot during any organised fashion shoot.

      • Equipment: If you’re using additional equipment such as reflectors, baffle boards, tripods, explain why you’re opting to do so. 

      • Assistants & others: Who will your assistant be and are you using other people to perform roles associated with the type of work you’re producing? (Technician, make-up artist, set builder, first assistant, 2nd assistant, runner, hair-stylist, stylist, food economist etc. Explain their roles and why you’re using them – make sure you get a shot of them in action and add it to your work following the plan stage (This evidences professional practice AC4).

      Go-see images (Model reference images) Try and get images of your models outside of the studio in their normal day to day clothes - 1 x full length and a head and shoulders shot as if you've previously had the model sent from the agency (See Jurgen Teller "Go sees" here) 

      Jurgen Teller 'Go-sees' click image for details


      • Travel details: If you’re travelling detail your travel arrangements explain what they involve.

      • Contingency plan: Be realistic – look at the potential for your shoot to go wrong – explain scenario's that might arise and what you’ll do to mitigate such a situation. Typical scenarios… Model doesn’t show up, Weather changes, Studio is booked/double booked, camera dies. 

      • Written up by plan:  Plan to have the images shot; off your camera and up-loaded to your design sheet with a detailed reflection within 3 days. Commit to this in your plan, if possible try and shoot at least once a week. 

      • Health & Safety (H&S) considerations: pre-empt any H&S issues that might arise and explain what you’re going to do in order to mitigate any accidents or any potential H&S issues.


      If shooting in the studio is your main mode of working, many of the points above will be repeated and may be a part of some of your knowledge design sheets If this is the case, you can copy the work from there and bring up to-date and contextualise with each of your shoot plans if appropriate. 


      Wednesday, April 24, 2024

      Your practical work - how to record it.

       You've planned your shoot and written up all your planning evidence trying to pre-empt any problems,  simply by the act of planning you to start to produce work that addresses criteria AC2 Problem solving

      The Shooting stage____________________________

      Check the basics - is the camera ready to use?

      • Batteries charged
      • SD card empty
      • Film in the camera
      • Film attached to the take-up spool (Check when you wind the first frame on)
      • The correct ISO set
      • The correct white balance set (Digital)
      • You have a basic plan of what you're going to do and what your intentions are and where you need to go.
      • You've got pose references if you're shooting models
      • Have got a range of outfits if working with a model 
      • You've money and your phone.
      Take pictures in accordance with your plan
      • Try and stick to your plan and shoot in accordance with your plan
      • Take images of the 'Set' with a wide angle lens to show where you're shooting and where the light is coming from or if in the studio how your lights are set up.
      • Get an assistant to take photo's of you shooting your pictures showing where you are in relation to the subject/model
      • Take photo's of your assistant doing their role and any other people that help you on the shoot - make-up artists, hair stylists etc. 
      • Shoot lots of images of your theme/idea - explore it, try and do it in different ways, different focal lengths, different view-points (from below and from above) 
      • Get models to jump and be active - exaggerated poses virtually always look good
      • Try deadpan poses on plain coloured or textured backgrounds
      • Consider shutting down your lens to f22 and shoot slow shutter speeds on purpose as an idea
      • Consider shooting totally out of focus
      • If shooting a model - change the venue/background/lighting
      • Shoot different poses - change outfits
      • If you see another idea - treat it as a separate shoot and write up a plan for it when you get home - get maximum value out of it. 

       The Post shoot stage_________________________________

      Get the work into your design sheet

      • Get the images off your SD card and onto your college Onedrive
      • Process the film and make a contact sheet and a handful of prints
      • Dependent on how detailed the shoot was and how many images you shot each shoot should have between 3 and 7 pages roughly.
      • The first page should follow on from your written plan for the shoot and should show images of
        • Wide shot of your set or where you took the pictures showing the lights/light
        • Wide shot of you taking the pictures with the model/subject in the shot.
        • If shooting models/portraits;  images of you interacting with the model 
        • Images that show professional practice in action e.g. being applied. For instance.... Health and safety practice, use of reference images for poses e.g. model or you referring to the images, Images of your assistants in action adjusting lights - holding reflectors. Make-up artists and others doing their thing.
        • Equipment that was used - flash heads, light meters, cameras, tripods etc.
        • Clothing and props that were used
        • Contact sheets 
        • Test shot images where you show that you've checked or tested something technical as a problem solving exercise.
      • A selection of the best images or a range of images that show how you've worked through your idea and tried a range of ideas out. This usually takes up around 2-4 pages if you're using around 9 images per A3 page.
      • Records of post production work produced using Photoshop or similar with screengrabs and annotations of any new knowledge that's been acquired and explanations and analysis of the differences the work has on your images. 
      • 2-6 of the finals presented as Portfolio style pages. 
      The work in terms of layout might end up looking like this...


      Tuesday, April 23, 2024

      Post Shoot Reflection


      You've now uploaded your images to your main design sheet from your shoot  -now you do the most important thing - Reflect.

      Reflection is the process of looking at what you've done and critically analysing it, identifying whether you've learned anything and moved forwards in any meaningful way. You also identify where you went wrong and what mistakes you made and what opportunities were missed and how these issues can be recognised and resolved as you move forwards and develop the project. Also look at the work in terms of what your intention was (Operational context) and ask critically is it fit for purpose?


      What happened: This only requires a sentence or two. Explain what you’ve done in terms of the type of photography you’ve produced and where it was shot using what camera…  “I’ve shot under-water shots of a model in a flowy dress in the pool at the studio in Basildon, these were shot on a Nikonos camera and they’re intended for use in a fashion magazine e.g. editorial”.

      How do you feel it went: Similarly, a short emotive response e.g. it was a disaster, frustrating, went really well, useful etc… “It was okay, I’d booked it for 3 hours and for over an hour of the time I had to do a lot of health and safety stuff which limited the shooting time, so was disappointing”.

      What value was there in the activity: This requires a lengthy and detailed response and allows you to look at the value of what you’ve done in relation to the all-important criteria. You should aim to discuss this in terms of each of the criteria AC1 to AC5. *Note, this requires that you have an awareness of the criteria and that you refer to it when working on your project. 

      Look back at the work you’ve just completed and analyse (Question) whether the work is coming together in the form or manner that you explained in your initial intention in stage 3?

      Look critically at your work – is it fit for purpose at this stage? Does it look anything like the finished article at this point, could the work be used/seen at this point in a professional scenario? Analyse why it does/doesn’t. If it doesn’t at this stage – what do you need to do to get the work to a professional standard, what needs to be improved – developed further? 

      Is your work looking like it fits within the operational context you identified in your initial plan (Stage 3). Analyse why/why not?

      If you were vague about your operational context initially in stage 3 – are you clearer having now produced this body of work? Update your thoughts on the operational context – what sort of photography are you producing, who might the client be, where might your images be seen and used, who is the target audience for your images and what are their demographic signifiers?


      Shoot folders & work-flow

       Digital images and workflow. (1). Workflow is a description of the method you use for handling your image files, organising, saving and sto...